Hi, My Name is

Micke Sarro

I’m a Master’s student at the University Of Turku with a strong interest in cybersecurity, drones, software development and artificial intelligence. I’m a motivated learner that likes to build things and take on new challenges.

In my free time I like flying and building small FPV quadcopters, but I’m also interested in the security aspect of drones and their future applications. I am also passionate about cybersecurity with a particular interest in penetration testing and reverse engineering. I’m currently looking for opportunities in these areas, but I’m also open to any other roles where my skills could be fitting.

I can be best reached through Email at: [email protected]


Projects

Movement Shooter

C#Game DevelopmentMultiplayerFPS
Movement Shooter

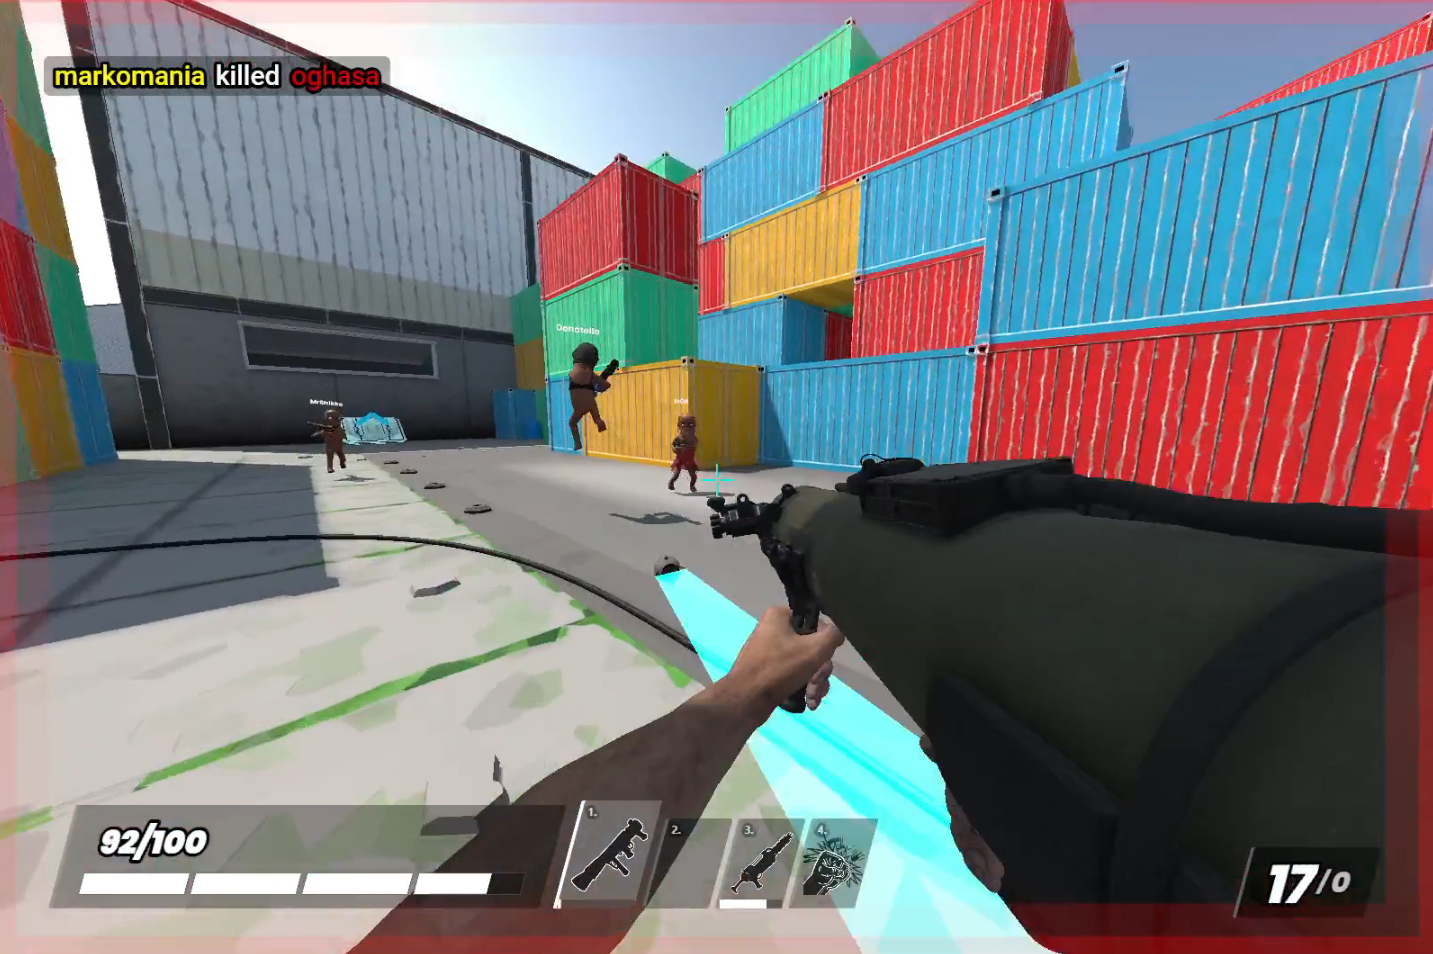
A multiplayer first-person movement shooter developed with a four-person team. It is built it using Facepunch's S&box game engine framework. The main goal is to create fun and intuitive movement with mechanics like bhopping and rocket jumping. Players can use weapons like railguns and rockets in a fast-paced Deathmatch game mode. It’s a continuous work-in-progress focused on fluid mechanics, stylized 3D graphics, and smooth gameplay.

What is the goal of our game?

  • Create a fluid, multiplayer movement shooter
  • Provide fun and intuitive movement mechanics based on Source engine physics
  • Make the game more accessible for newer players with the addition of an Easy Strafe mode that simplifies the core movement mechanics of the game
  • We also ensure full controller compatibility without sacrificing advanced movement capabilities

What can the player do?

  • Weapons: Equip a Melee weapon, Assault Rifle, Railgun, and Rocket Launcher.
  • Movement: Utilize bunnyhopping, surf ramps, jump pads, and rocket jumping to navigate the map.
  • Game Modes: Play classic Free-for-All Deathmatch.
  • Tutorial: Play through a dedicated tutorial designed to teach core movement, rocket jumping, surfing, and jump pad usage.

Game Features & Systems

  • Full Controller Support: Play on a controller, including full support for bunnyhopping and strafing via Easy Strafe mode.
  • Matchmaking & UI: Clean user interface featuring a simple server browser to find ongoing games.
  • Map Voting: Integrated map voting system at the end of matches (although currently featuring only one map).
  • Dynamic Spawning: Multiple spawn points with line-of-sight checks to prevent players from spawning directly next to enemies. Includes distinct spawn visual effects.
  • Match Progression: Features a death cam upon being killed and a post-match podium highlighting the top 3 players based on total kills.

What does the player see and hear?

  • Visuals: Stylized 3D environments, custom 1st-person weapon viewmodels, and clear visual indicators for interactive elements like jump pads and surf ramps.
  • Audio: A wide variety of detailed sound effects for player movement, weapon firing, impacts, and ambient environment noise.

Attribution

This project uses the “Sauce-Movement-Base” by SmileCorp, licensed under the Creative Commons Attribution 4.0 International License.

Original code available at: https://github.com/smilefordiscord/Sauce-Movement-Base.git License details are included in this repository.

Analog VTX Interferer

ArduinoSmartAudioHardwareC++FPV
Analog VTX Interferer

A DIY Arduino-based controller that communicates with an analog FPV video transmitter using the SmartAudio protocol. It allows you to easily set the transmitting channel, output power, and pit mode without needing a flight controller. By wiring an Arduino Nano to a BetaFPV VTX and adding a single push button, I can quickly cycle through channels and power levels on the fly. It was a great hardware experiment to better understand analog video signals and data protocols. A video showcase on GitHub.

DIY SmartAudio VTX Controller

A small Arduino-based controller that talks to an analog FPV video transmitter over the SmartAudio protocol — letting you set channel, output power, and pit mode without a flight controller.

Built and tested with:

  • Arduino Nano
  • BetaFPV M03 analog VTX (25–350mW, 5.8GHz)
  • A single push button for on-the-fly channel and power control

Hardware

Component Role
Arduino Nano Runs the SmartAudio packet engine, reads the button, drives the VTX
BetaFPV M03 VTX + Antenna Analog 5.8GHz video transmitter, controlled over SmartAudio
Push button Short press = change channel, long press (1s+) = cycle power level
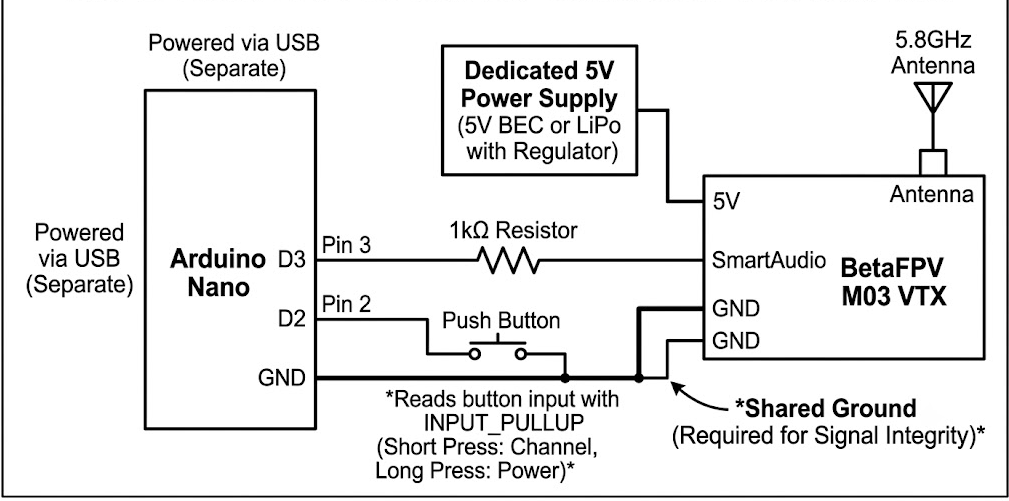
Split-rail 5V power Arduino gets power from USB-C connected to computer. VTX gets power separately from a powerbank or from a standard charger to handle the RF amplifier’s current draw, sharing a common ground with the Arduino for signal integrity

Wiring

Below is the full wiring diagram:

Arduino Nano to VTX Wiring Diagram

Through trial and error I figured the 1kΩ resistor is important, since SmartAudio is a shared, half-duplex, single-wire bus. Without it, the Arduino and VTX briefly driving the line at the same time can cause contention and corrupted commands.


Usage

  1. Wire the Nano to the VTX as described above, sharing ground.
  2. Flash vtx_controller.ino via the Arduino IDE.
  3. Plugging power should immediately start broadcasting on the configured startup channel.
  4. Short-press the button to step through channels; long-press to cycle power levels.
  5. Opening the Serial Monitor at 115200 baud shows what’s being sent.

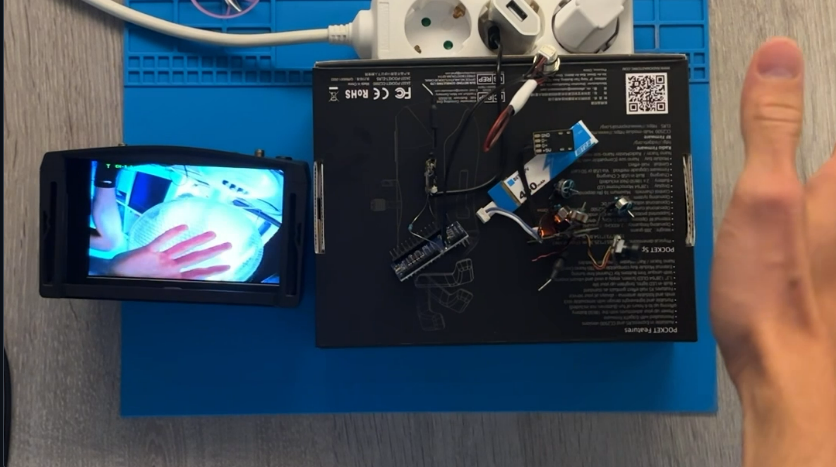
Clear video feed from another VTX transmitting a signal

Powering up the arduino VTX and toggling through to the same channel (RACEBAND CH-5) shows clear interference


Troubleshooting & End results

  • VTX resets to pit mode every power cycle: There were a lot of problems of settings not persisting over power cycles. This is most likely due to these cheaper VTX modules re-sending the config every boot.
  • Flickering / intermittent signal: There were also problems with the signal being weak or flickering, probably due to noise on the SmartAudio line. The VTX was also running hot during a lot of testing and at the end it might’ve burnt. This meant that I was unable to get a completely working version.
  • Next steps: Following steps in the project could be adding a receiver so the controller can scan for active signals first, then automatically setting the VTX to match it. This would work rather than manually checking every band and channel. This could be done by using the automatic search logic from the goggles for searching the strongest signal.

PythonDockerIoTMiddlewareMQTTCoAPFlaskThingsBoard
IoT Platform

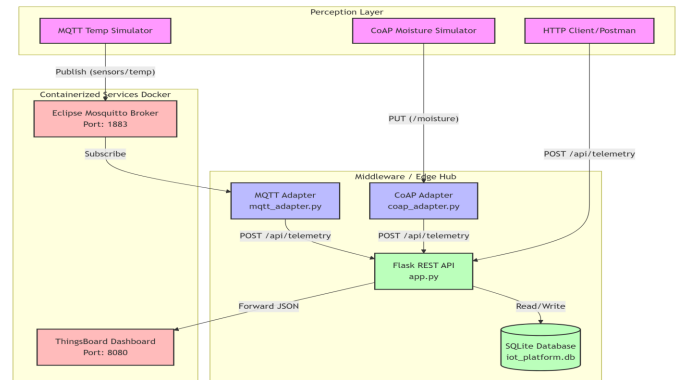
A lightweight multi-protocol IoT middleware that connects physical edge devices to cloud-based dashboards. It handles device registration, local data storage using a SQLite database, and automatically forwards telemetry data to a containerized ThingsBoard instance. The platform features a decoupled architecture, meaning it can handle HTTP, MQTT, and CoAP protocols simultaneously without blocking. It’s a complete pipeline built with Python and Docker to bridge local sensors and cloud visualization.

Lightweight Multi-Protocol IoT Platform

A lightweight IoT middleware that bridges physical edge devices and cloud-based visualization platforms. This platform handles device registration, local data ingestion, persistent storage, and data forwarding, while supporting multiple application-level protocols simultaneously (HTTP, MQTT, and CoAP).

Features

  • Multi-Protocol Support: Handles HTTP, MQTT, and CoAP telemetry simultaneously.
  • Decoupled Architecture: Standalone protocol adapters prevent blocking issues within the central API.
  • Local Storage: Edge persistence using a lightweight SQLite database.
  • Dashboard Integration: Automated data forwarding to a containerized ThingsBoard instance.

Prerequisites

  • Docker & Docker Compose
  • Python 3.x

Installation & Setup

  1. Start Containerized Services (Mosquitto & ThingsBoard):
docker-compose up -d

(Note: This maps Mosquitto to port 1883 and the ThingsBoard UI to port 8080).

  1. Set up the Python Environment:
python3 -m venv venv
source venv/bin/activate
pip install Flask requests paho-mqtt aiocoap
  1. Initialize the Database:
python3 init_db.py

Running the Platform

Because of the decoupled architecture, the core API and the protocol adapters must be started in separate terminal windows (with the virtual environment activated in each):

  1. Start the core REST API:
python3 app.py
  1. Start the MQTT Adapter:
python3 mqtt_adapter.py
  1. Start the CoAP Adapter:
python3 coap_adapter.py

Testing / Simulating Data

  1. Register a Device: Before sending data, register a device to map it to a ThingsBoard token.
curl -X POST http://127.0.0.1:5000/api/register \
     -H "Content-Type: application/json" \
     -d '{"name": "TempSensor_1", "protocol": "MQTT", "tb_token": "YOUR_SECRET_TOKEN"}'
  1. Run Simulators: Update the DEVICE_ID variable in the simulator files to match the ID returned from your device registration, then run:
python3 simulators/mqtt_temp_sim.py

or for CoAP:

python3 simulators/coap_moist_sim.py
  1. Verify Data: You can view local historical telemetry by calling the API:
curl -X GET http://localhost:5000/api/data/<device_id>

Or visit http://127.0.0.1:8080 to see the live data in your ThingsBoard dashboard.
Stream Deck Project

PythonFlaskWeb UIJavaScript
Stream Deck Project

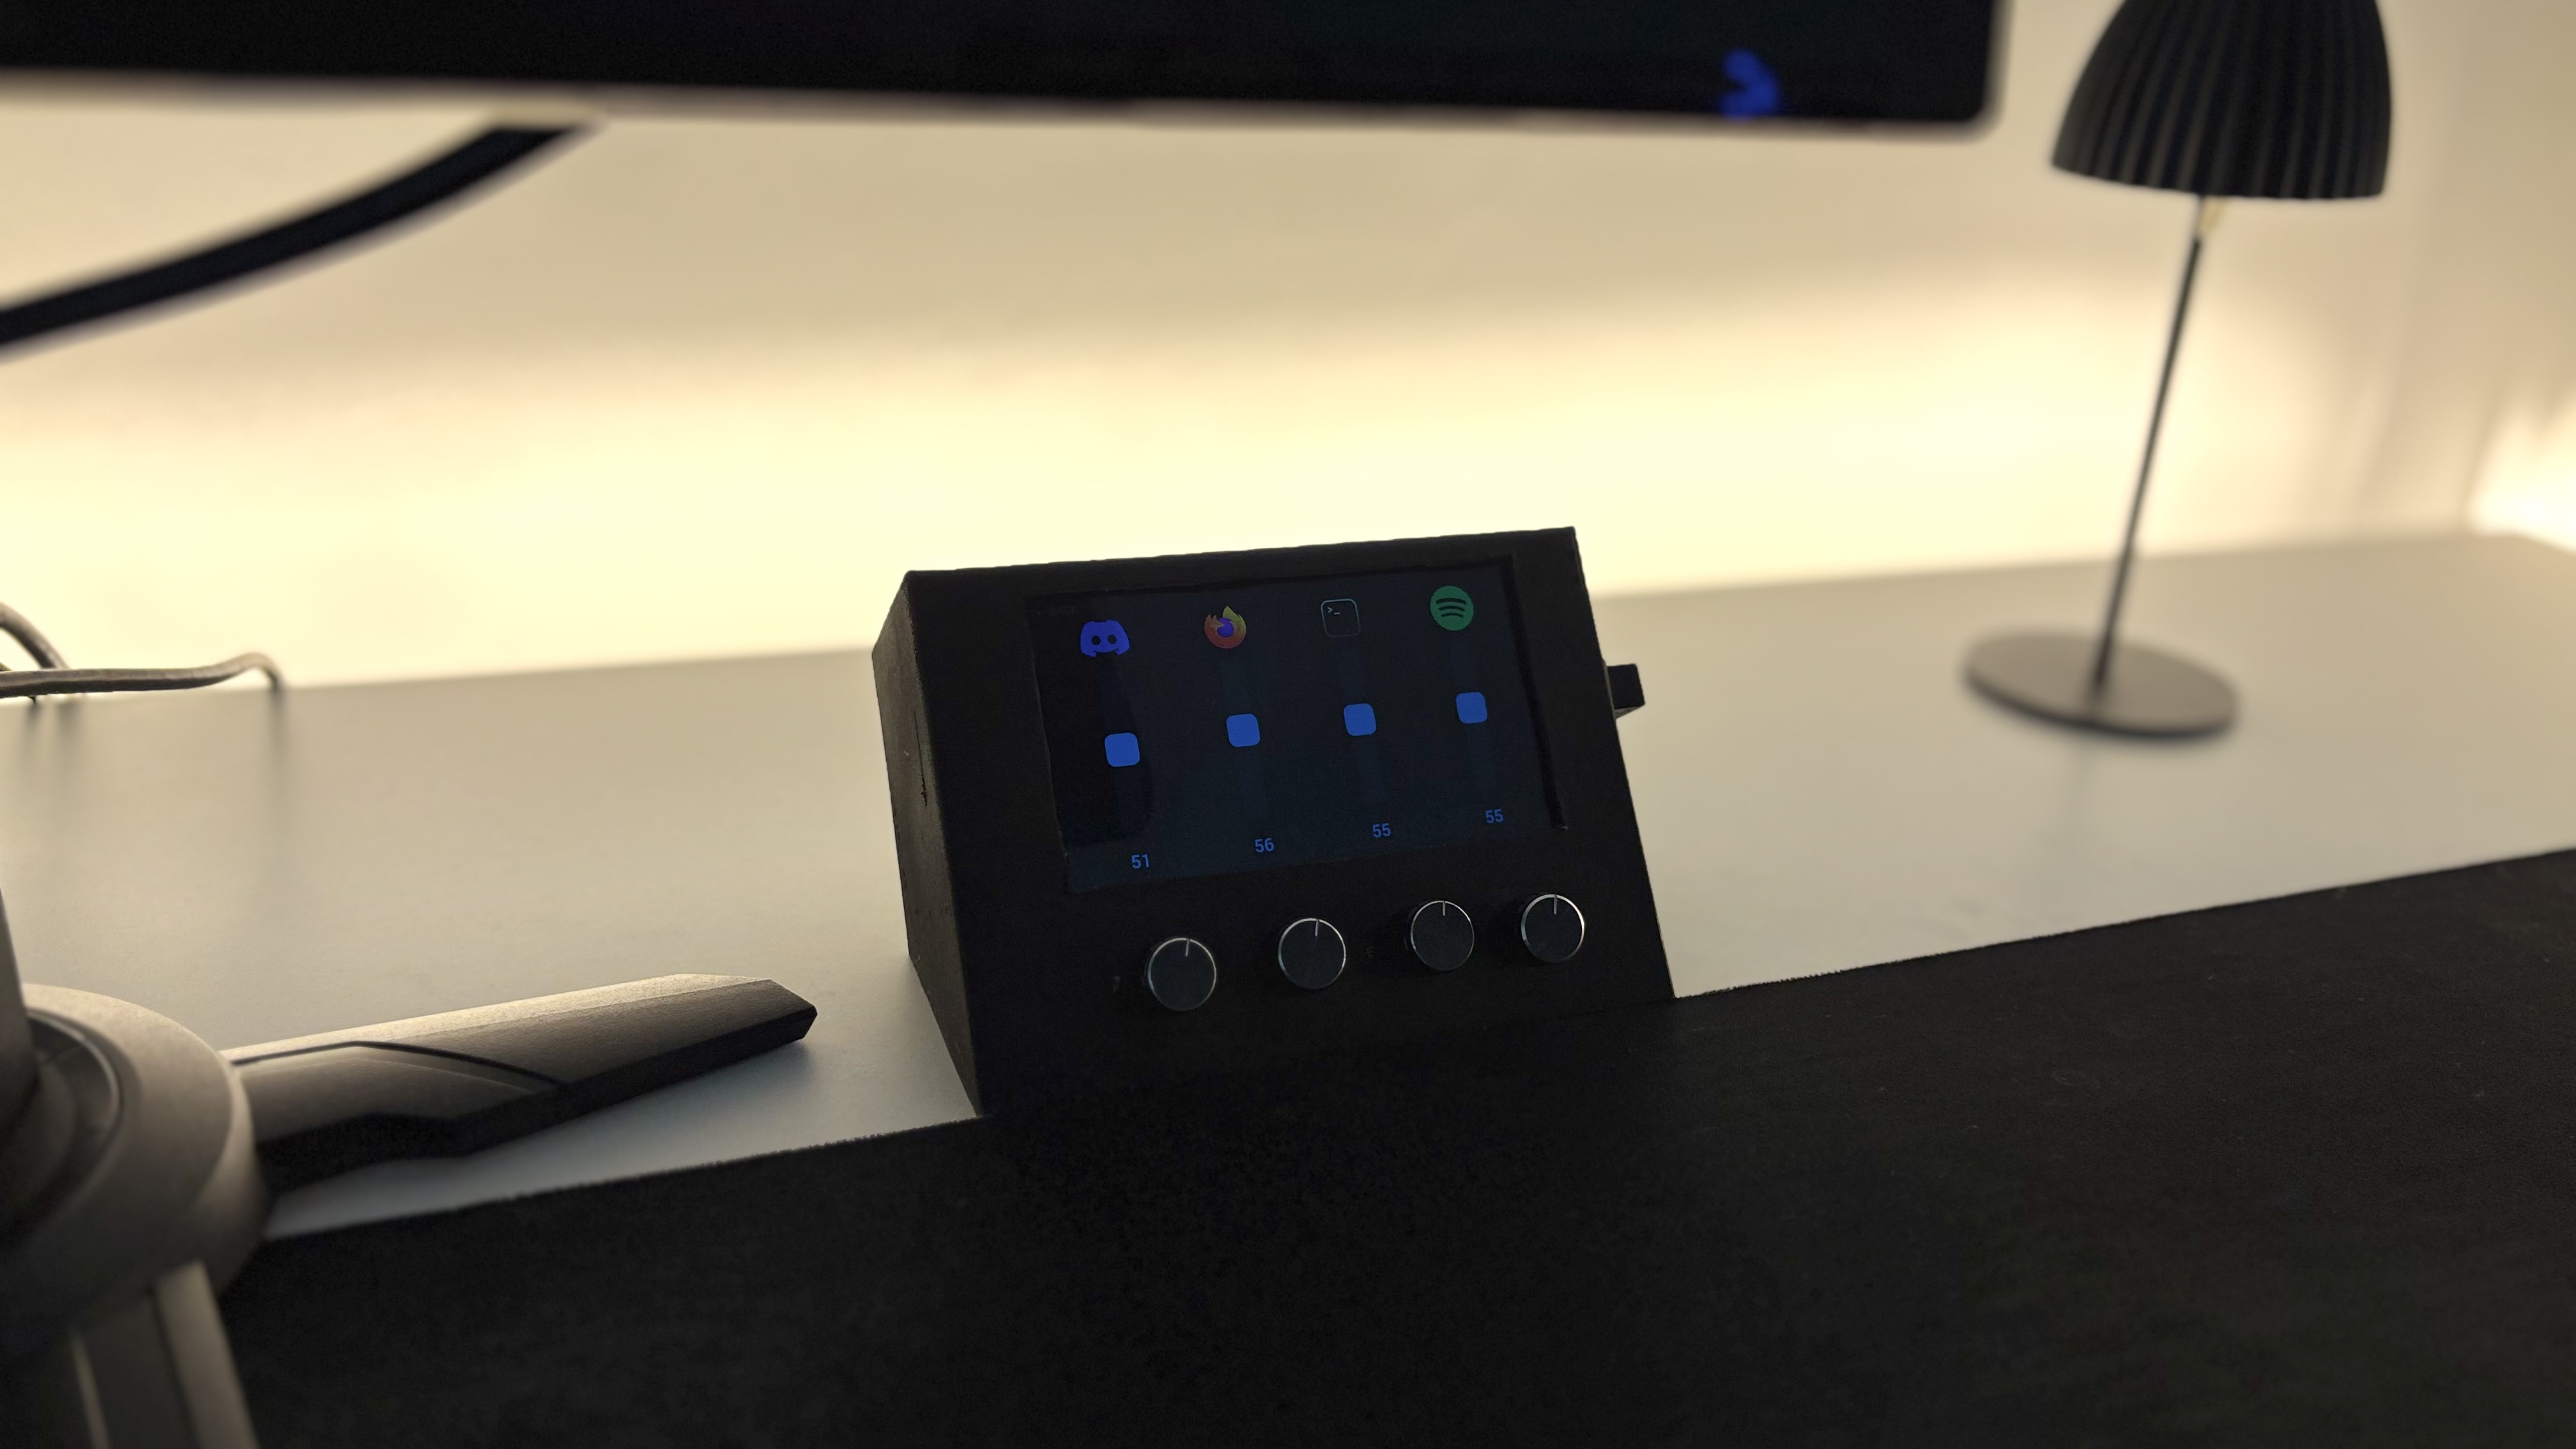
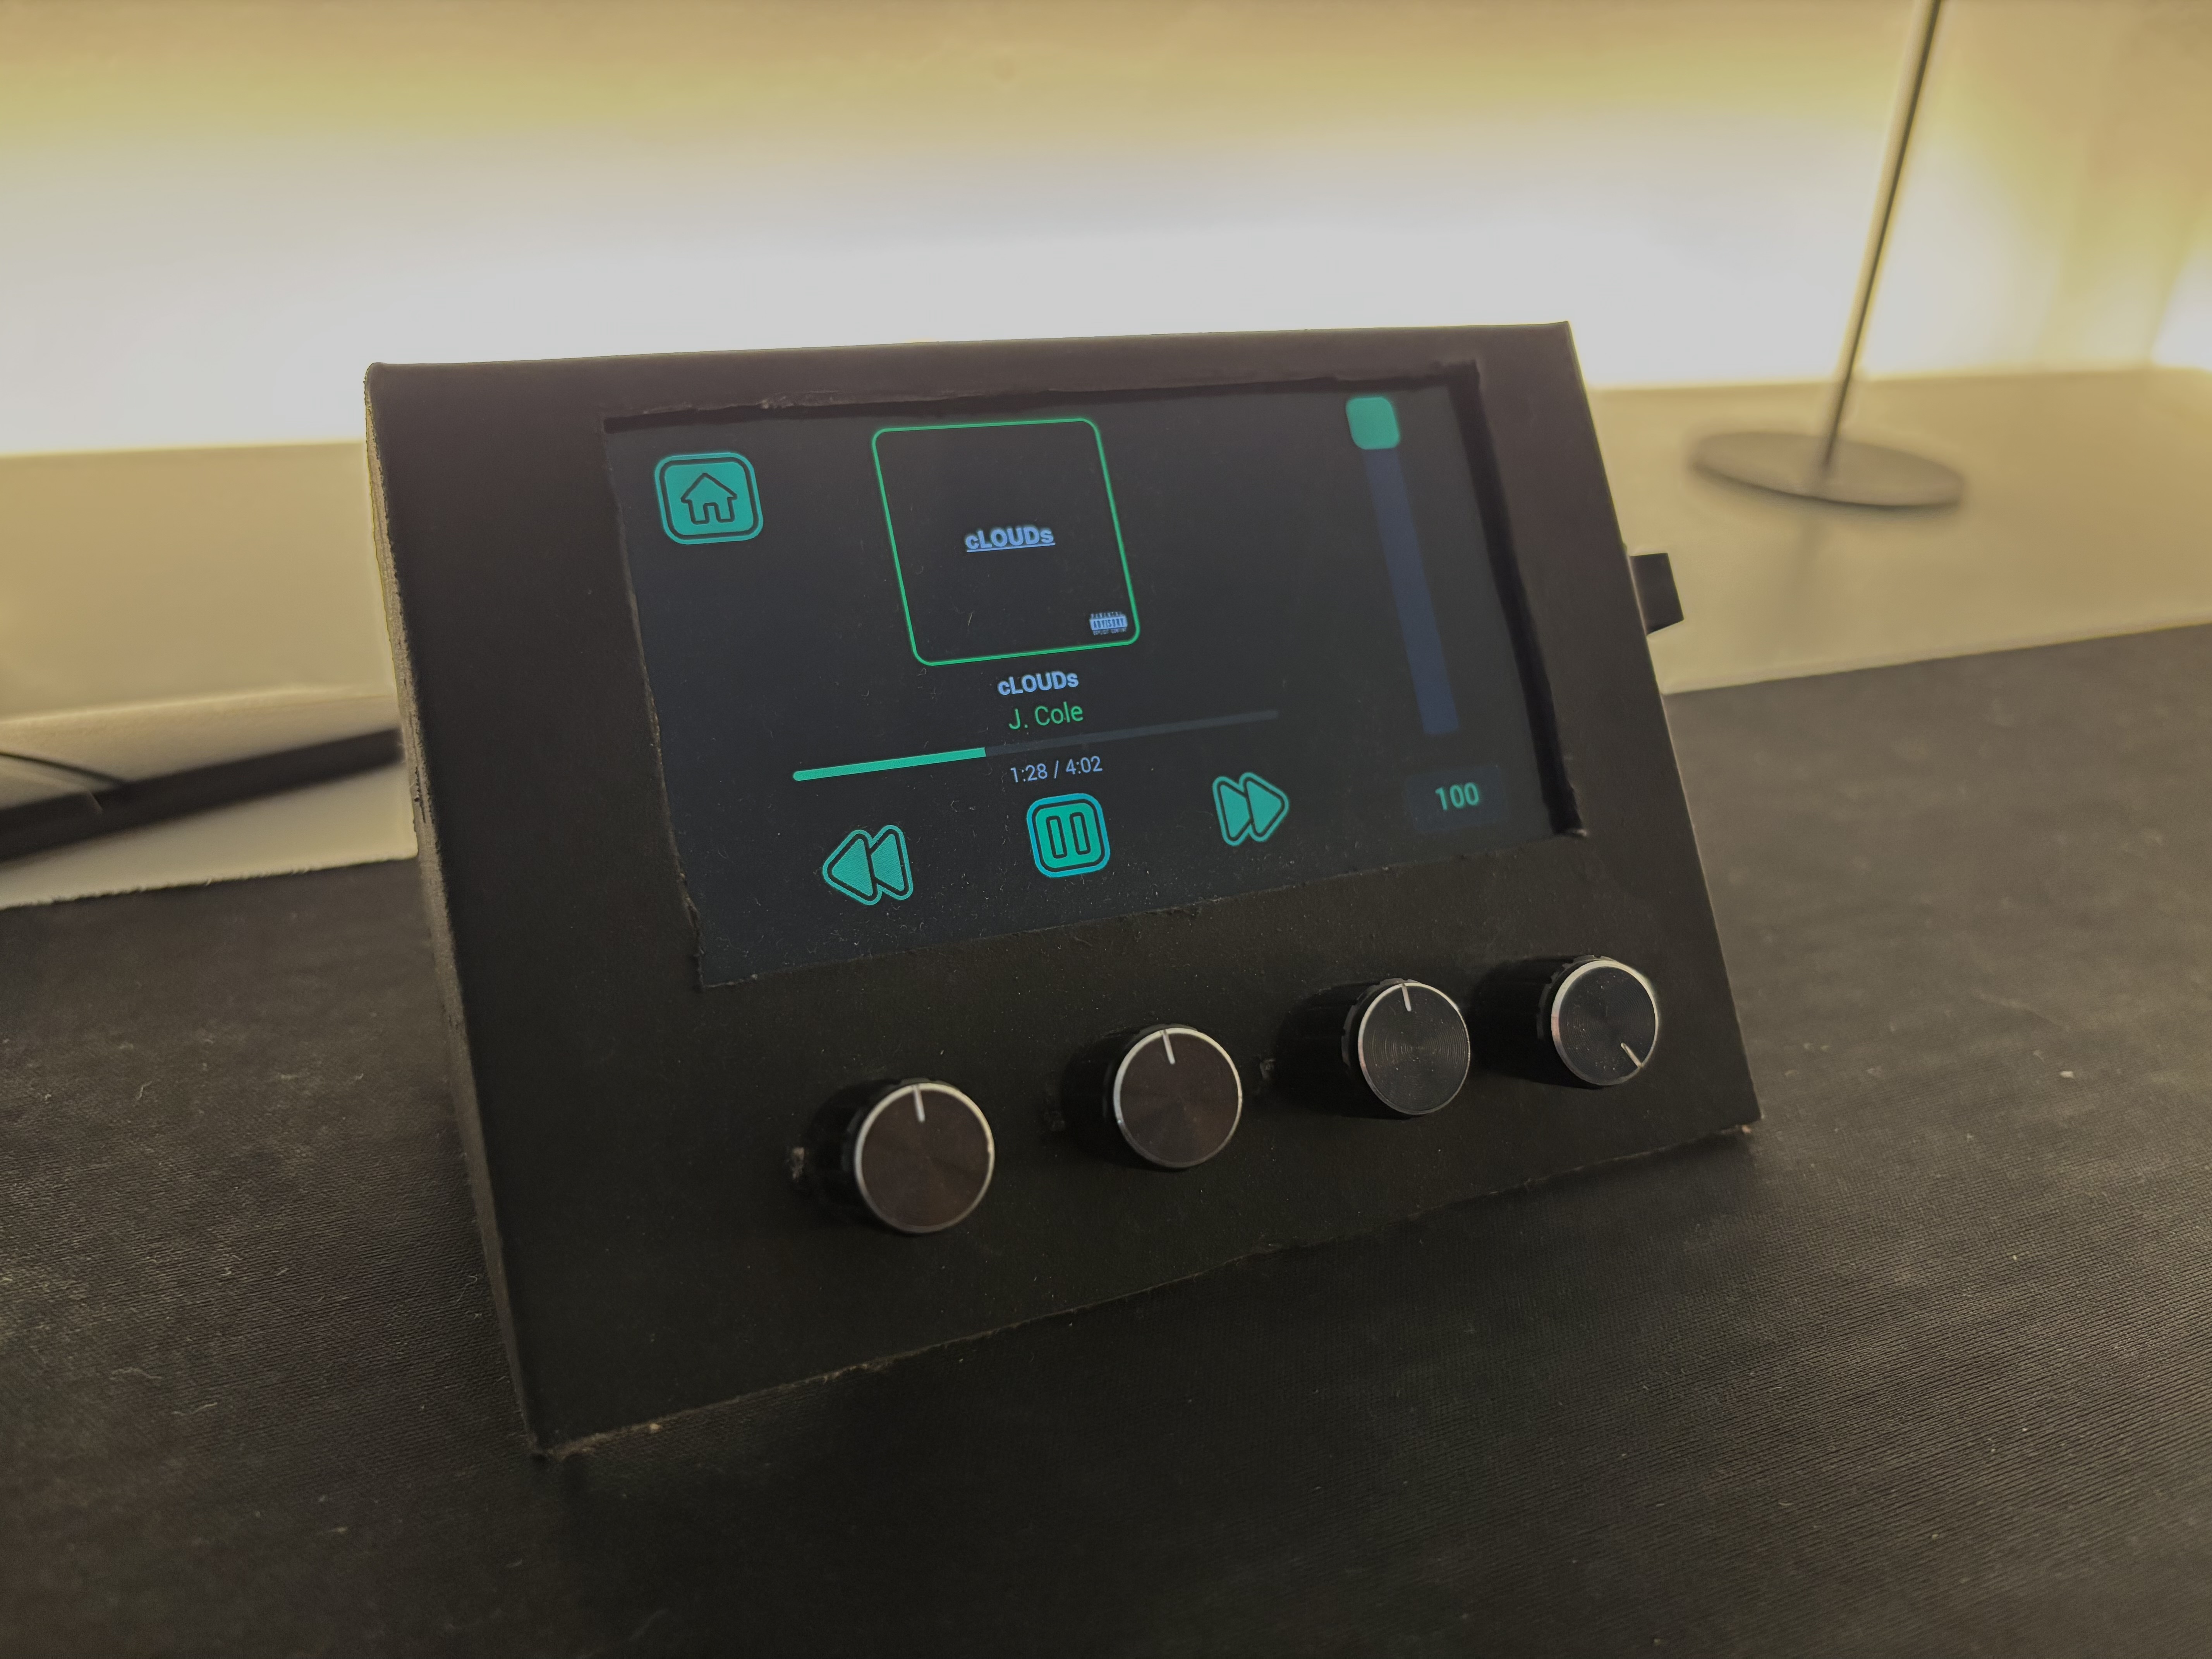
A custom built touchscreen Stream Deck paired with a physical audio mixer. It uses a repurposed Samsung Galaxy S3 for the touch interface and an Arduino Nano paired with 4 potentiometers to physically control audio. The setup lets you independently mix the volume of specific PC apps like Discord, Firefox, and Spotify. A local Python Flask app connects the phone and PC, providing on-screen media controls, live volume sliders, and a dedicated Spotify dashboard. A more in-depth showcase can be found on the GitHub page.

Custom Stream Deck & Hardware Mixer

Custom-built touchscreen “Stream Deck” paired with a physical audio mixer. It uses a repurposed rooted Samsung Galaxy S3 as the touchscreen interface, while the physical hardware mixer runs on the deej software using an Arduino Nano with four potentiometers.

Features

  • App-Specific Volume Mixing: Four physical knobs let you independently control the volume of specific applications (like Discord, Firefox, and Spotify).

  • Visual Mixer Display: The Galaxy S3 screen shows which app is mapped to which knob, featuring live volume sliders and percentages.

  • Spotify Dashboard: A dedicated media screen pulls live data from Spotify, displaying the track name, artist, album art, and a live progress bar.

  • Touchscreen Controls: On-screen buttons allow you to quickly manage media (Play/Pause, Rewind, Skip) or execute quick actions like deafening Discord or switching audio outputs.

Arduino Nano to VTX Wiring Diagram


How It Works

  • At bootup the MixerApp.exe launches in the background. Background threads start and monitor the PC’s active applications, volume levels, and Spotify status.

  • Once the Galaxy S3 is plugged in via USB, the bundled Android Debug Bridge (adb.exe) detects it.

  • The script uses ADB to automatically set up port forwarding or USB tethering, creating a private network bridge between the PC and the phone.

  • After the bridge is established, the Flask app starts hosting the local web app.

The Display

  • The S3’s web browser navigates to the local IP address where Flask serves up the HTML, CSS, and JavaScript interface.

  • The host PC provides the data in JSON format, where the phone reads it to make changes like move the volume sliders, update the song title, or change the album art.

Actions

  • For media and especially Spotify data, Windows’ media session API is used to pull the info. This info is then cached in audio_manager.py to avoid unnecessary requests.

  • Audio actions are handled using nircmd.exe to talk to the Windows Control Panel.

  • Other actions like Discord are handled using keyboard shortcuts.

Showcase

Currently the physical mixer and the smartphone are fitted into a cardboard box that’s painted black. A 3D printed case would be the next addition to have a more finalized look. Other future additions would include a simple function to easily add/remove buttons and actions into the mixer.

Poker Game

JavaGame DevelopmentNetworkingClient-ServerSocketsGUI
Poker Game

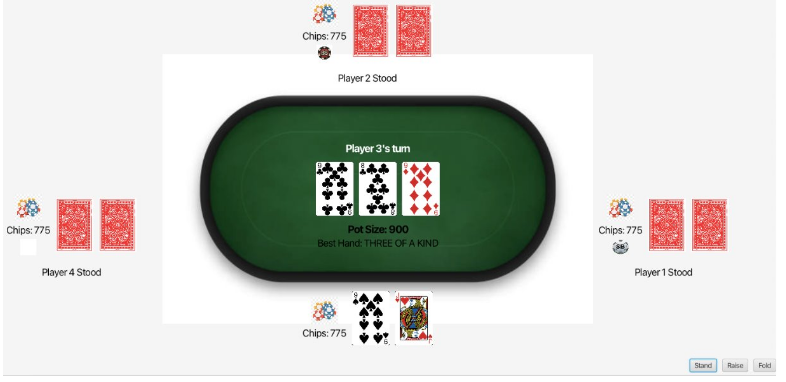
A Java-based multiplayer Texas Hold’em poker game designed for online play with up to eight players. I built it using a custom server-client architecture, utilizing standard Java Sockets to manage the game state and process real-time player actions. The project evolved from a simple terminal-based prototype into a full graphical application using JavaFX. It also features a custom logic evaluator to automatically determine the strongest winning hand for each player. Overall, it was a great way to practice networked gaming logic, concurrency, and real-time client-server communication.

Multiplayer Texas Hold’em Poker

A Java-based multiplayer poker game designed for online play. This project demonstrates the implementation of networked gaming logic, real-time client-server communication, and a graphical user interface.

Project Overview

The goal of this project was to create a functional Texas Hold’em experience that supports up to eight players simultaneously over a network. The development progressed from a terminal-based prototype to a full socket-based application with a dedicated UI.

Key Features

Multiplayer Capability: Supports up to 8 players in a single online session.

Socket-Based Networking: Built using a server-client architecture where the server manages the game state and processes player actions.

Hand Evaluation: Includes a BestHandEvaluator to automatically determine the strongest hand for each player.

GUI: A graphical interface built with JavaFX.

Core Technologies

Language: Java

UI Framework: JavaFX

Networking: Java Standard Library Sockets (Socket, ServerSocket)

I/O Handling: BufferedReader, BufferedWriter

Concurrency: Runnable interface for handling multiple client connections

Development Tools

JDK: Java Development Kit

Thesis

Älykkäisiin sähköverkkoihin kohdistuvat kyberuhat ja niiden torjuminen

  • LaTeX
  • Smart Grids
  • Cybersecurity
  • Academic Writing
  • Research

TURUN YLIOPISTO

Tietotekniikan laitos

Micke Sarro: Älykkäisiin sähköverkkoihin kohdistuvat kyberuhat ja niiden torjuminen

TkK-tutkielma, 23 s.

Tietotekniikka

Toukokuu 2025

Abstrakti

Älykkäät sähköverkot ovat moderni infrastruktuuriratkaisu, jossa sähkön tuotannon, jakelun ja kulutuksen hallitsemiseksi hyödynnetään kaksisuuntaisia digi- ja viestintä- teknologioita. Näiden järjestelmien keskeisiä etuja ovat energian tehokkaampi käyt- tö, verkon parempi toimintavarmuus sekä mahdollisuus integroida uusiutuvia ener- gianlähteitä osaksi sähköntuotantoa. Samalla näiden järjestelmien vahva riippuvuus tieto- ja viestintäverkoista altistaa ne monenlaisille kyberuhille. Tässä tutkielmassa tarkastellaan älykkäisiin sähköverkkoihin kohdistuvia kyberuh- kia ja keinoja niiden torjumiseksi. Työssä kartoitetaan keskeisimpiä hyökkäysvek- toreita, kuten palvelunestohyökkäyksiä, haittaohjelmia, tiedon manipulointia ja si- säpiiririskejä, sekä analysoidaan niiden mahdollisia yhteiskunnallisia vaikutuksia. Lisäksi työssä perehdytään nykyisiin kyberturvallisuuden arviointi- ja torjuntame- netelmiin, kuten tunkeutumisen havaitsemisjärjestelmiin, tekoälypohjaisiin analyy- simenetelmiin sekä turvallisuusarkkitehtuurien kehityssuuntiin. Tutkielma korostaa, että älyverkkojen kyberturvallisuus on moniulotteinen ilmiö, jo- ka vaatii teknisten ratkaisujen lisäksi myös organisatorista ja inhimillistä huomiota. Kattava kyberturvallisuus edellyttää riskien tunnistamista, ennakoivaa suojautumis- ta ja jatkuvaa sopeutumiskykyä kehittyvään uhkaympäristöön. Lopuksi työ tuo esiin kyberturvallisuuden keskeisen roolin yhteiskunnan toimivuuden ja huoltovarmuuden turvaamisessa. Asiasanat: älykkäät sähköverkot, kriittinen infrastruktuuri, kyberturvallisuus

View Full Thesis on UTUPub